Websites are the starting point for many small businesses. Knowing how to set one up and operate them is a key part of growing your company and reaching a larger audience. In this guide I will show you how to set up and self-host a WordPress website through docker.
Disclaimer
This guide is specifically designed for Ubuntu Server, but some parts of it may be generalizable to other operating systems, though compatibility is not guaranteed between operating systems and versions. If you would like to install Ubuntu Server click here for my full guide.
What you need
- Computer
- Ubuntu Server
- Docker
- Docker Compose
- Nginx Proxy Manager
- Domain or Subdomain
- Router Capable of Port Forwarding
Making the file structure
I like to keep my files organized per docker container. Using this guide’s file structure is recommended but not required. first make the folder, by navigating to your docker folder or the folder that you keep all of your docker containers in, in my case it is named docker.
~$ cd dockerNext make your WordPress folder, in this case it will be called “wordpress”
~/docker$ mkdir wordpressNow navigate to the new directory
~/docker$ cd wordpressCreating the files
Next we will create the docker-compose.yml file for wordpress.
~/docker/wordpress$ nano docker-compose.ymlOnce in the text editor, paste the following:
services:
  wordpress:
    image: wordpress:latest
    container_name: wordpress
    depends_on:
      - db

    environment:
      WORDPRESS_DB_HOST: db
      WORDPRESS_DB_USER: wpuser
      WORDPRESS_DB_PASSWORD: changeme
      WORDPRESS_DB_NAME: wpdb

    volumes:
      - wp_data:/var/www/html
      - ./php/uploads.ini:/usr/local/etc/php/conf.d/uploads.ini

    restart: always

    networks:
      - npm_default

  db:
    image: mariadb:10.6
    container_name: wordpress_db
    command: --transaction-isolation=READ-COMMITTED --log-bin=mysql-bin

    environment:
      MYSQL_ROOT_PASSWORD: CHANGEME_ROOT
      MYSQL_DATABASE: wpdb
      MYSQL_USER: wpuser
      MYSQL_PASSWORD: changeme

    volumes:
      - db_data:/var/lib/mysql

    restart: always

    networks:
      - npm_default

volumes:
  wp_data:
  db_data:

networks:
  npm_default:
    external: true
Note that all values in this color are placeholder values that should be changed depending on your personal configuration. for example, npm_default should be changed to the network that nginx is connected to. Your passwords should also be changed to something strong. and user should be changed to the username the file directory is located under.
Once Done, Press Ctrl+O, Enter, Ctrl+X.
Next we will make a directory and .ini file for max upload size and other configurable things we would like to change later.
~/docker/wordpress$ mkdir php
~/docker/wordpress/php$ nano uploads.ini
Once in the text editor, paste the following:
upload_max_filesize = 1000M
post_max_size = 2000M
memory_limit = 1000M
max_execution_time = 300
Again, note that all values in this color are placeholder values that should be changed depending on your personal configuration
Running the container
Now, go back to your wordpress directory
~/docker/wordpress/php$ cd ~/docker/wordpressand run the container.
~/docker/wordpress/php$ docker compose up -dnow go to nginx proxy manager and click “Add Proxy Host”. In the popup menu use the following settings:
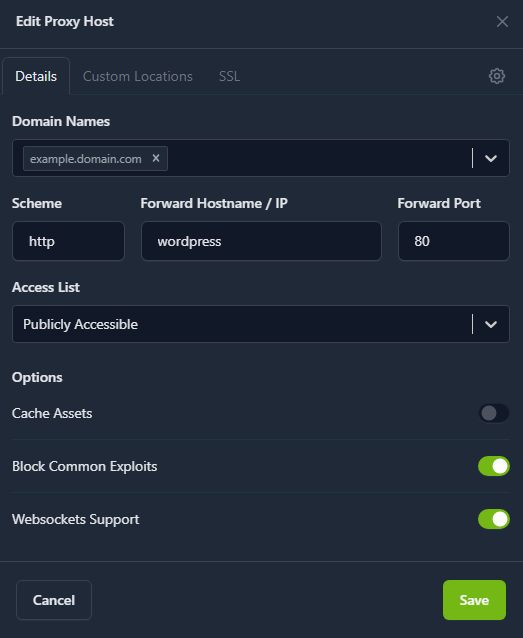
Note: WordPress and Nginx must be on the same docker network for this to work. It is mandatory that you use port 80 as this is WordPress’s default port.
replace the example domain with the domain you would like wordpress to run on and click on the SSL tab. Under SSL, use the following settings:
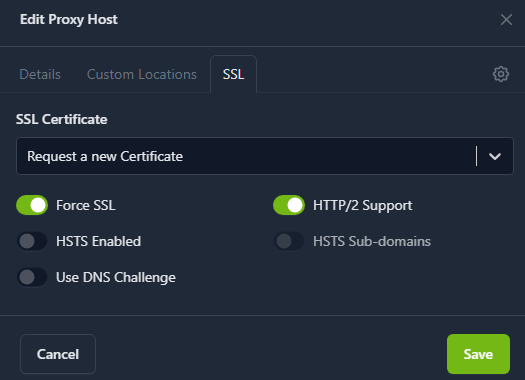
Force SSL and HTTP/2 Support must be enabled, and select Request a new Certificate. Press Save. if this gives you any errors, ensure your proxy is configured correctly and running on ports 443 and 80 for SSL certificates to be properly verified. Ensure that your domain is pointing to your public IP address and that it is set as a type A record.
Once you have saved and the proxy is online, connect to the domain you entered. You should be greeted by the WordPress setup page. follow the instructions and create an Administrator username and password. Once done go to yourdomain.com/wp-admin and login.
Congratulations, you have successfully installed WordPress!

No responses yet